advice on re-core fuel cell hatch


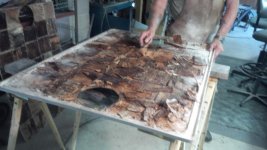
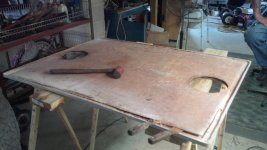
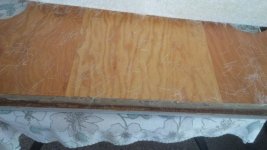
i had a fun day today, actually not to bad, thanks to some great advice from vic, did this in 1.5 hour with a $4.00 flapper wheel from harbor freight.


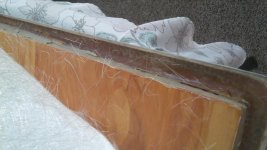
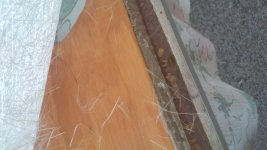
was going to use foam like nidacore or divinicyl, but cant find it locally in less than a whole sheet. probably going to go back with plywood. whats a good one to use? the wood in there was 3/8, thinking about going back with 1/2 or 5/8.

Ideas?
 
Ferm did a write up on this several years ago.

Putting a "bevel" edge on the plywood will make getting the glass to stick without bubbles a lot easier around the edges.

I hinged mine to make access easy to the tank and fittings.
 
Just what im looking for, but currently not available at any store within 150 mile radius. Can get some exterior 3 ply locally
 
The little roller they sell to aid in removing air bubbles and shaping the mat on contours is very helpful, and as far as the hatch holes ,it's important to keep the hatch flat when you apply the core but try not to let the resin-drip through the hole and seep back onto the top side of the hatch cover, I taped around the opening, good thing I did! Hope this helps some.
 
Are you going to do the little squares or one piece?

I'd be afraid that one piece would eventually warp, especially if you use 1/2" 3 ply pine. Might even twist when you wet it with resin or while its setting up?
Not that I know... I haven't done a full deck or large flat piece...yet...
 
Found local 4x8 i/2 kiln dried treated ply from local boat builder. $80. He'll sell me what i need , 30"x43". But its still $80. Probably gonna go with that.
Was thinking cabosil to bond wood to hatch, then seal all with couple of layers of 6 oz.

Any thoughts

I thought it was a little overkill, greyduk, but it sure saved a lot of itching.

Thanks for the tip,step. Was wondering how to avoid drips. Luckily i have a large piece of starboard to us as a work table and i have to repaint deck afterwards anyway.
 
Skunk, i was going to do one piece, I think this is at least 5 ply, not sure.

I did notice on the fishbox lid, they added a stiffener down the middle
 
made a little progress past couple of days. found some 1/2 marine ply, so went with that.


even managed to get the "Ferm" bevel on it


we are going out tomorrow, so needed a tempory hatch. this is some old 3/4 shelving i had in the shed.


V20 looks good with a dance floor
 
never did like the way wellcraft had sheet metal screws holding down the hatch, too easy to strip out, kept loosening up, etc. decided to see if i could improve on this. screwed some aztec board to the stringers, going to drill and tap and put some 1/4-20 stainless screws in them. for the ones on the forward side i had to epoxy some starboard on the lip, bulkhead was to far away.

the "clamps" are pieces of 2" pvc, work great


when i changed out the tank 3 years ago, i had to cut the lip off one side. replaced it with aztec also


epoxy supplies should be here tuesday, tying to get it back together for snapper season,

all 3 days of it
 
supposed to rain today, so i started this phase:


well, weatherman lied, but i was already committed,


waiting on epoxy to cure now. not too happy with work, ply had more warp in it than i thought, hope i got a good bond
 
I did ridge, i had 6 five gallon buckets full of water, plus a couple of of battery cores and 100 lbs do lead ingots on it. I applied a thickened mixture of cabosil and epoxy on the hatch, wet out the ply and put it on the floor. Then stacked the weight on. Worked great. After that, a layer of 6oz cloth.

Solid as the deck of the kitty hawk now.

Exactly skunk. I was thinking about doing the squares again, but figured this was faster.

Worst part of the whole deal is my caulking.
 
Ferm did a write up on this several years ago.

Putting a "bevel" edge on the plywood will make getting the glass to stick without bubbles a lot easier around the edges.

I hinged mine to make access easy to the tank and fittings.

Bradford did you hinge it on the v21? If so I'd like to see/hear how you did it.
 
Bradford did you hinge it on the v21? If so I'd like to see/hear how you did it.

Its a boat, no matter how well you seal it its gonna get water or at least condensation in it. My original tank had at least a dozen holes in it some fist sized due to water corroding the aluminum.

Hinged it just like the fish box, all hinges for all my hatches are on the port side. The tank is not foamed in, its 5200ed on treated 2x4s 5200ed to the bilge. You can rinse the salt off the tank and all drains to the bilge. No foam lets the tank breathe and sweat which its doing anyway, and allows for rinsing it off, the hinged lid allows for easy inspection plus eliminates having the pie plate inspection ports with all their screws rotting out your new hatch lid. Did this way back in 03 or 04 before I found this place and has worked great with no issues. Others will have different opinions much like etec vs yamaha, chevy vs ford, reagan vs mondale.

Wish my tech retarded *** could figure out the pics, not bragging, but y'all would love my V.
 
Hear are a few photos of my recoring,of my 86 v20 fuel tank panel, I used 3/4 in. Marine plywood, smooth edges, and used 5200 to attach to panel. Then made peanut butter with poly resin and talcum, to smooth out the edges. I used 1.5 oz matt,,followed by a layer of 1078. First time working with fiberglass. Next the live bait panel.
 

Attachments

  • IMG_20160618_132302.jpg
    IMG_20160618_132302.jpg
    49.6 KB · Views: 21
  • IMG_20160618_131209.jpg
    IMG_20160618_131209.jpg
    47.4 KB · Views: 22
  • IMG_20170928_123916.jpg
    IMG_20170928_123916.jpg
    47.8 KB · Views: 19
  • IMG_20170928_123923.jpg
    IMG_20170928_123923.jpg
    43 KB · Views: 16
  • IMG_20170928_123938.jpg
    IMG_20170928_123938.jpg
    41 KB · Views: 18
Back
Top