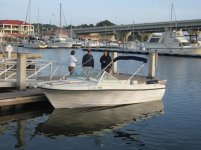
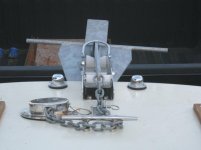
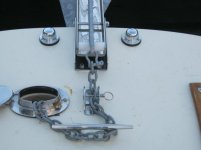
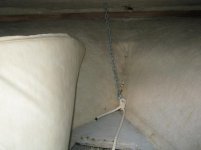
The anchor pin is welded into place and will not come free. I do need to replace the beaded chain that retains the lid to the rope/chain hole. Wire leader is what I was thinking - coated is a better idea.
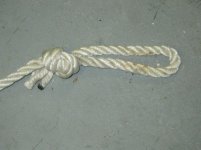
I don't know knots very well. This is an "anchor hitch" I found online. I was gonna tie or tape the tail back. An eye splice sounds smart... is it as strong?
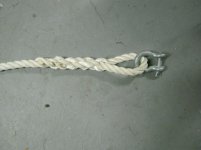
Ok, if the shackle's pins are welded then there's not much you can do except cut them off with a hacksaw and buy new ones. If you go that route make sure you get
anchor shackles.
The coated wire leader works very well.
The rope/chain hole is called a hawse pipe.
Rope is called line. Line starts out as small strands of rope that are twisted together to make a strand. Three strands are then twisted together to make a line.
The chain is called an anchor rode.
The tail or end of a line is called the bitter end.
A rope with a knot will reduce a ropes breaking strength by 40 to 65%, depending on the knot.
An eye splice will still retain roughly 95% of the ropes strength.
You will need to get a metal (not plastic) thimble of the right size for the rope you are using, and either a lighter or some masking tape. The thimble keeps the line from chaffing and greatly increases the life of the line. Most people will tape the ends of the strands with tape. I like to use nylon line, so I usually melt the ends of the strands with the lighter and while they are still hot I form them into a point. The point makes weaving the strands through the line easier. CAUTION!!!!!! if you go this route, remember that melted nylon is
VERY hot, will stick to your skin and will burn you severly if you touch it too soon. I use a stainless steel plate and an old file and I roll the melted nylon between the two of them to make the point while the nylon is hardening.
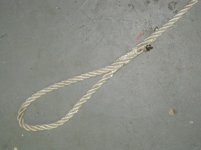
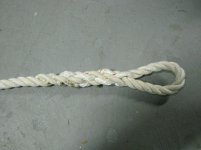
To make an eye splice, or really just about any kind of splice in a line, you just have to unravel the bitter end of the line into the three strands, and then re-weave (also called tucking) the strands back into the body of the line. I'd be happy to make up a sample and send it to you, and I could try and describe how to do it here, but there are far better writers than I on the internet that have already made posts with detailed instructions on how to make a splice. A really good one can be found at this link
http://www.boatus.com/boattech/casey/SpliceRope.htm
Just remember that all you're really doing is tucking the strands of line back in on themselves one at a time. You tuck one strand in, pull it snug, then take the next strand and tuck it in over the strand you just tucked and under the next strand,, you just repeat it over and over. I usually make my splices about 6 inches long for a 1/2 " line. A little less for thiner line and a little more for thicker lines. Unless the line is really tight or is old and stiff you can open up the line with your fingers. If it's tight then you'll need a marlinspike or a fid. (A marlinspike is metal, a fid is wood.) Both of them come in different sizes. Both of them are round tapered objects coming to a thin point at the end, and are inserted into the line between the strands to open a hole for the strand to be woven through. (You can use a screwdriver with some success if necessary)
After you have made your eyesplice you simply take the new anchor shackle, put it through the eyesplice and the first link of your rode chain, screw in the pin (after you coat the threads with a little neverseize), and safety wire it shut so it cannot back out. Poof... all done.
(Look, I know that this sounds like a large undertaking, but really, once you know how to do this it shouldn't take you more than 15 minutes from start to finish)
Send me a PM with an address if you want me to send you some samples

PS. A really neat little trick to consider is to drill a hole on the bottom shank of your anchor and then attach the rode chain to that point, then tie it loosly to the top of the anchor shank with some coat hanger wire. (I just wrap about a dozen turns around the chain with no twist or knot) Under normal conditions the wire will keep the anchor in the proper position for holding your boat, but if your anchor becomes fouled and hung up a really strong pull on the anchor line will cause the wire to unravel and free the chain. Now, since the chain is attached to the bottom of the anchor you can usually pull out the flukes from whatever was hanging you up. This is NOT for use on an anchor that you would use for overnight camping since there is always the possibility that a strong wave would do the same thing and you would start drifting, but it's a good trick to use if you are anchoring up and fishing over wrecks or reefs.