Wellcraft, V20 and Steplift remain the property of the Wellcraft Company
Install the app
How to install the app on iOS
Follow along with the video below to see how to install our site as a web app on your home screen.
Note: This feature may not be available in some browsers.
You are using an out of date browser. It may not display this or other websites correctly.
You should upgrade or use an alternative browser.
You should upgrade or use an alternative browser.
1981 V20 Restoration
- Thread starter Dana A
- Start date


Pipe_Dream
God

GO BABY GO!
Was that hull really yellow all along? I swear that is amazing!
Looking forward to splashdown of you "new" V20!
Looking forward to splashdown of you "new" V20!
Dana A
Member
Was that hull really yellow all along? I swear that is amazing!
Looking forward to splashdown of you "new" V20!
That is the original gelcoat. I though it was a faded white or beige when we pulled it from the woods
Dana A
Member
Dinner break quick update
Decided the hull came back so good we need to paint the liner, windshield pulled.
Gas Tank arrived, aligning for pads and a few other things going on!
And to throw a monkey wrench into todays progress an acquaintance saw what we were up to and said " I have a boat that needs some work, if you want it you can have it for free" 80's 25' Whaler Frontier. went and looked at it.
We now have another project in the works.


Dana A
Member
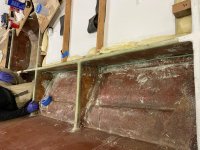
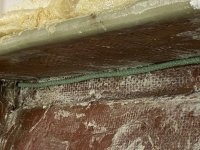
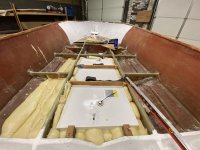
So my concern was moisture in the foamed compartments with it having nowhere to go and would sit in there forever.
Was thinking how to have a channel at the bottom for the weep holes in the bulkheads on the sides.
So we did a test on the two compartments with the foam left from the tank.
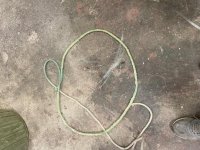
Came up with this idea -
Take a piece of potwarp and coat it in wax and run it along the bottom, foam it, let the foam cure then pull it out. Well the foam cured and I couldn't move the rope. Two guys feet on bulkhead giving it everything we had it popped free.
Now have a 1/2 in weep channel at the bottom of the foam.
Was thinking how to have a channel at the bottom for the weep holes in the bulkheads on the sides.
So we did a test on the two compartments with the foam left from the tank.
Came up with this idea -
Take a piece of potwarp and coat it in wax and run it along the bottom, foam it, let the foam cure then pull it out. Well the foam cured and I couldn't move the rope. Two guys feet on bulkhead giving it everything we had it popped free.
Now have a 1/2 in weep channel at the bottom of the foam.
Attachments
Last edited:
billfish16
Junior Member
So my concern was moisture in the foamed compartments with it having nowhere to go and would sit in there forever.
Was thinking how to have a channel at the bottom for the weep holes in the bulkheads on the sides.
So we did a test on the two compartments with the foam left from the tank.
Came up with this idea -
Take a piece of potwarp and coat it in wax and run it along the bottom, foam it, let the foam cure then pull it out. Well the foam cured and I couldn't move the rope. Two guys feet on bulkhead giving it everything we had it popped free.
Now have a 1/2 in weep channel at the bottom of the foam.
Amazing progress!

charlie_the_tuna
God
I may have missed this part, but how big is the tank?
billfish16
Junior Member
I may have missed this part, but how big is the tank?
#32 Report Post
Old 04-19-2021, 11:17 AM
Dana A's Avatar
Dana A Dana A is offline
Modified the fuel tank size to the maximum we were able to get in thru the factory opening gaining 10 gal now a 70 gal tank.
one addition not on the drawing is a second ground tab by the fill
Be here the end of next week.


 That is going to be one fine-looking and solid V when you are done. My V I remove the outside skin and poured it with Arjay, the 'curve or angles" on my transom is still factory, One day I will remove the cap and do restoration like yours, at the same time it is going to go from a Cuddy to CC


SkunkBoat
God
I don't see pvc bilge pass thru under the tank?
What about bilge water from anchor locker and fwd center?
Whats your plan?
Last edited:
.jpg")
Pipe_Dream
God
I've been absent from the internets for a while (and what a blessing it's been!) so I just came back and saw your latest pics. Wow, when you are finished she's going to be better than new!
SkunkBoat
God
I feel better!


