Transom repair???

jetblue319

Junior Member
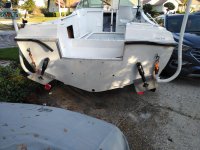
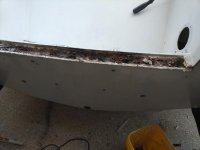
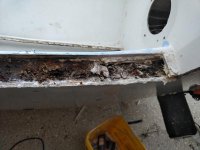
well, as i was installing my Lenco trim tabs, to the transom of my 86 v20 cc, brown water came out of the drill holes. When i purchased the boat i did check for flexing on the transom, and when i removed all the hardware from the swim platform, engine mounting bolts, i didn't noticed any rot from the holes. the boat has not been in water for 6 years, it sat on a trailer or blocks, covered. Any way to verify how much damage is done? If the transom must be repaired has anyone used "coosan board blue 26" from boat outfitter instead of marine plywood.? any advice is appreciated. i did see skunkwork's you tube video.
thanks
jet
 
Last edited:
About the only true way I know of to accurately check for rot is to drill a series of holes in a pattern across the transom. Check the kind of wood that comes out of each hole. That way you can verify the extent of the dry rot, if there is any. Seal each hole with 5200 after you check it. (Use a Q-tip to force the 5200 all the way into the hole). In all cases the very fact you have water intrusion into the transom is cause for concern. If there is no appreciable rot you have to find out where it's coming from and stop it to prevent further damage. Check for flexing again. 6 years is a long time for water to be laying up against the wood without causing any rot. :head:
 
I would do as D suggest, drill some holes along the bottom of the transom and see what drips out. I know some guys who set up a small vacuum pump and let it pump each hole for a couple of days to dry it out. Once you get it as dry as u can, i d wet out the holes with gorilla glue, then fill them with wooden dowels coated with the same glue. After everything cures, sand out and finish with small dab of Marine Tex.

This is the main reason i ve never put tabs on , scared to death to drill 10 or 12 holes in the bottom of my transom.

The right way would be the skunk method, but this might buy you a little time.

Be sure and take lots of pics and post em
 
The vacuum pump sounds like a good idea. After that, you might try sustained heat with a heat lamp(s) or some safe heaters aimed at the area over a few weeks th drive the moisture out after sucking it out.
 
I wouldn't panic...yet..

Nearly all 30+ year old boats have water at the bottom of the transom. The effect of multiple screw holes from transducers over the years and the screws and opening at the drain. Also, the stringers had holes drilled at the transom that weren't sealed. The stringer wood butted against the transom wood with no glass in between

Remove the garboard drain. Let it drip.
You can try a pattern of 1/8" test holes as stated but you can do them inside instead of outside. get a sense of what wood is wet and soft and black. If a hole is suspect drill it bigger to get a good look.
A few inches at the bottom isn't a death sentence.

Check the stringers in a few places too!

Do the thumping test also.

If you saw my video you see that the corners of the cutout are a susceptible spot. There was wet black mush in the corners and at the bottom near old screw holes. But as I stated in the video, I think my concern was overblown and that remaining wood wasn't in danger of catastrophic failure.

If possible, remove the motor and get under the trim there, cut off the glass and look at the top of the wood. Dig in the motor mount holes to look for black mush. Then it's all up to you to decide what to do.


I wouldn't use 5200 to refill holes. Use epoxy in a syringe. You have to fill from the back of the hole out, if that makes sense. Otherwise you are just making a bubble on the outside.
 
Last edited:
I was wondering is it better to remove the back skin of fiberglass on the transom and then the rotten plywood and replace with Coosa Board and then reglass? I currently have everything remove on transom (engine, platform) except the new tabs I installed. ( have to fight that 5200 on the trim tabs and drain plug. I signed up for a West End fiberglas workshop in February. Again thanks for the inputs
Jet
 

Attachments

  • IMG_20181229_1637242.jpg
    IMG_20181229_1637242.jpg
    79.3 KB · Views: 25
In my opinion, never cut the back skin.
1.
All of those wrap around edges were formed with layers of glass and you will never be able to wrap around the outside corners.
2.
The V20 transom IS NOT FLAT.. Once you cut off the outside and remove the wood you will be hard pressed to get back to the original shape.
Stop thinking you are going to put one big flat piece of coosa across the stern. It won't be right.
 
At the very least I’d do a thump test and see if you can pinpoint the severity of it. Tapping on it with a hammer you will get 2 very different sounds from wet and dry wood. Dry wood will be a sharp, crisp crack when you hit it. Hit it high on the transom to get used to this sound. When you find moisture it will be a dull thud. Where you’re putting tabs I’d assume if it isn’t from a previous transducer it’s probably where the stringers meet. If this is the case if it doesn’t seem to be very far spread I’d say just recheck for flex regularly and run it.

Don’t cut your outer skin off. Don’t ask me how I know. It’s possible on many boats but as skunk said these transoms are in 3 pieces and there’s no way to recreate the shape and have the skin fit properly. Might look “ok” but it wouldn’t be 100% bonded and solid. Skunks pour method is the way to go but if you’re not getting flex I would try to get a couple more years out her.
 
http://www.westsystem.com/ss/assets/...aintenance.pdf

This is a pretty good how to book for basic glass work

If i was going to do a transom, I d do skunk s pour methoud and try to address the stringers as well. To do that your talking about cutting off the aft section of the cap or total removal.

That link is not working, look in the link section of this site on the second page, bradford posted it under fiberglass repair
 
Last edited:
thanks everyone , will look into skunkwork's method, i seen that a few times on you tube. and trying to see what materials i will need. boats in storage, will do thump check when i get over there. will get back to you all when i start thanks again
jet
 
I drilled a hole for a transducer one time on the V, water came out and I was devastated. Then I looked inside the bilge and saw that the hole I drilled was below where the wood ended, through solid glass...the water had come from inside the boat.

Something to check.
 
Follow Skunks advise, don't cut the outer skin! The hull can twist and change its shape. I had to redo mine back in 06, cut it all out from the inside. Went back with marine plywood and polyester resin I got from Carolina Classic nearby. Turned out great, rock solid! No trouble since but I keep it wrapped up under a shed.
 
CarbonCore transom

I've said it before in other transom threads but a viable shortcut would be to expose only the top edge of the transom at the motor cutout. Then use the chain saw to remove as much wood as you can reach. Try really hard to clean the inside of the hollowed out transom, block all holes and then pour 2 buckets of Carbon Core.

This would skip the hard part of cutting the cap and removing the motor well.

I recommend CarbonCore over Seacast because it really pours and leaves no air pockets.

Every one I've seen done this way ended up having the skin seperate from the core because the remaining wood on the skin tore free. I have nothing against the pourables, but the chainsaw method doesn't clean them the surface enough to get a proper long term bond IMHO.
 
Every one I've seen done this way ended up having the skin seperate from the core because the remaining wood on the skin tore free. I have nothing against the pourables, but the chainsaw method doesn't clean them the surface enough to get a proper long term bond IMHO.

ya that kinda worried me enough to take mine apart and grind both surfaces clean. I haven't seen any longterm outcomes from the shortcut.
I think there may be a way of removing just the motor well to get enough access to get some of the inside skin off and grind. Hopefully I'll never do a transom again!
 
The wood that came out was brown not black ...good.

As best as I can tell it may be wet at the top edge. Again...they are all wet there...If the glass is separating from the wood its a problem. I would cut that top edge off where the motor mounts and look at the wood and see if the skin is separated from the wood.

Its a tough call. Its your call.


Did you ever stand on the motor when it was in place?
If the transom didn't flex, I would glass over the top edge, mount the motor with a transom saver and go fishing.
 
Well I finally got a chance to work on my transom. I cut it just like shunkwork's video, and it was rotted in the centers so far. Have to work on it some more tomorrow.
 

Attachments

  • IMG_20190425_1903507.jpg
    IMG_20190425_1903507.jpg
    38.5 KB · Views: 30
  • IMG_20190425_1903591.jpg
    IMG_20190425_1903591.jpg
    54.7 KB · Views: 28
notice in the second picture how it is 2 pieces coming together on an angle. It does the same on the port side. So you see the transom is not one big flat piece of plywood.

I still can't tell from the pix if its shot. Mine was soft in the corners and I panicked but after tearing it apart I saw it was pretty solid down a few inches. Thats going to be your call.

If you go ahead, consider limiting your cuts to the motor well and not go into the hatch openings like I did. You might find you have enough room to remove much of the inside skin.
 
Many of these transoms in these boats are made of a BUNCH of square chunks of plywood all held together with resin and glass. The idea was the smaller pieces were easier to work with, cheaper since they could use up scraps, and the multiple pieces held together with resin and glass meant each section was isolated from the other so if water got in and rot started, it was isolated to just a few squares, and not the whole transom. The downside is you have so much glass and resin to deal with cutting them apart.
 
Back
Top