V2o Steplift

"Just getther done"

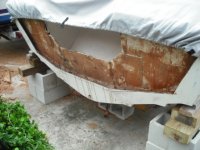
Removing the wood is quite a challenge even with the partial skin removal, The wood at the sides are sold, pain in the neck, I am moving up to rental saw 20" bar in the morning its going to get done.
Tip: If you ever pounce upon a hull to good to be true PASS :)
As for the material for the transom I am in a dilemma not sure which way to go just yet.
SeaCast have a distributor here in Florida, hour drive from where I live , Price is still 215 for 5 gallon.
Nida Core is still 119.00 (I can pick up also 2hr drive)
Arjay is 159.00 will drop ship for 20.00
Which one should I use? HEEEEEEEEEEELP !
 
Welcome to the site,great project going on, but you shouldnt have cut the outter skin off.
Cant pour in a new transom with the skin off.
 
Ready to Rock

I will apply a few layers of woven mat with laminating resin to the inside walls of the transom with emphasis place to strengthen the skins and sealing all existing holes, I will not pour unless I felt its seal and strong. I will then re-attach the outer skin and glass it in before the big pour! I will post pictures as I work along.
Biggest let down so far was the darn chainsaw will not start I rented from Moon Belt Rentals.
My 16” chainsaw I brought from a pawn shop did the job.
 

Attachments

  • Clean Skin.jpg
    Clean Skin.jpg
    47.4 KB · Views: 31
  • Clean Transom.jpg
    Clean Transom.jpg
    50 KB · Views: 39
Coming along so is Christmas!

Moving along, Skin is back on as you can see, extra careful in securing it both with mat on the outside and in side. Re-coated the inside skin with resin. I can bet the farm the skin is on stronger than before.
I cut large pieces of fiberglass mat and soak it with resin and bonded it from the inside, four layers to be exact.
The stuff you see here is Fiberglass kitty hair and jelly as final coat.
DSCF0044.jpg

DSCF0045.jpg

DSCF0046.jpg

DSCF0047.jpg

Sanding it tonight and apply coat to imperfections and re sanding again then Gelcoat after the pour!
 
Wow Pour Completed

I am done pouring the Transom Arjay, its solid as a rock..I know it will outlast the Boat !
I not planning to install a cap, I hate it period. I will do some final sanding then paint primer.
DSCF0019-1.jpg
 
Looks great!! And there are a few here that took the alum caps off and just glassed and sanded to seal the transom. Much better way of doing it!
 
Looks great!

Looking great...I'm waiting on cooler weather here to tear in to mine...your giving me the confidence I need!
I'm very interested in your application of the gel-coat. It would be great to see alot of pics of that. I've heard you can brush it on as well as spray it. Seems like the brushing on would look like crap but I'm not familiar with gel-coat. Which are you doing?
 
Re:

Thanks, Its easy make sure you seal EVERY HOLE, Arjay can be best describe as thick paint if it finds any hole it will spill out, That was my only little problem, also it does cure and heat up very hot so don’t panic. As for the Gel Coat I am still up for ideas, I am using the local guys for ideas, I may paint or gel not sure yet but I will let you know.
 
Thanks, Its easy make sure you seal EVERY HOLE, Arjay can be best describe as thick paint if it finds any hole it will spill out, That was my only little problem, also it does cure and heat up very hot so don’t panic. As for the Gel Coat I am still up for ideas, I am using the local guys for ideas, I may paint or gel not sure yet but I will let you know.


GREAT JOB!!...looks good...one of these days on mine, and I'm gonna get rid of that ugly-*** cap, too...
 
Great Job!!...:clap:


one suggestion...those hatch lids on your stern have a bad habit of gettin' broken because they lay all the way over on the cleat as your picture shows...you might wanna consider a STOP chain inside of some kind to keep it from layin' all the way over like that...
 
Great Job!!...:clap:


one suggestion...those hatch lids on your stern have a bad habit of gettin' broken because they lay all the way over on the cleat as your picture shows...you might wanna consider a STOP chain inside of some kind to keep it from layin' all the way over like that...

Thanks, I will install a stop chain ..Good tip .
 
Update

I made my plans, however when I went to work my plan I was forced to make changes.

I initially said I was going to roll and tip the gel not spray, this did not work out since the Home Depot sold me a roller, which came apart during the rolling.
I bit the bullet and brought a real gel coat gun with the correct nozzle 4.7 mm.
See link http://cgi.ebay.com/Gel-Coat-and-Re...ryZ26197QQssPageNameZWDVWQQrdZ1QQcmdZViewItem
It goes back on ebay when I am done!

My progress so far with the Gel coating looks promising so I decided to do the entire Boat!
I have since remove the rails and patch all holes etc.
I pull the 60-gallon aluminum tank more holes that the government bailout plans.
Purchase a Poly tank used for 30 bucks, I will foam it in, its one inch too long for the hole on the deck, I will cut the deck floor and re-glass (I am confident I can re-attach it without any issues)

In the previous pictures hope you guys notice I eliminated the deck drains from both sides of the boat and re-routed both to the inside in the bilge area. I also lower the main drain hole in the transom to fully drain the hull!

Sanding, I refuse to go with the manual sanding block and that’s my line and I am sticking to it.

The orange peel effect from the previous extra thick spray (deliberately done to fill all minor flaws), I was forced to go with a 60 grit to cut the peel yes its that hard, and 220 to prep it for the final coat.
I am using the GelCoat as primer in this step if so to speak.


I am using a De-Fault palm sander and producing exceptional results, once this is done on the previous spray I will mist on a light coat of GelCoat and DURATEC HI-GLOSS CLEAR Mix 50/50 with gelcoat for a beautiful high-gloss finish.
I will post pictures of all the aforementioned steps
 
Back
Top