jeffmo
Junior Member
i meant to post this a while back but got busy and had a 2 week lake Erie trip.
i wanted to re-paint my motor cover so i hit the net and found some help because paying to have it done was going to run me about $300.
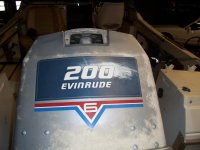
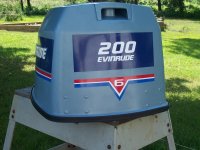
well,i stripped it down first and then used sandable primer and applied several coats of it and wet sanded between coats.after that i used several coats of matching evinrude blue paint.after that i applies 4 coats of clear coat with a wet sanding between each coat.since i couldn't purchase new nameplates i had to remove the old ones and strip them down.after that i hand painted the white lettering w/ white enamel paint and dark blue for the background. a local graphics business made some new decals for me and a new gasket finished the job off.i included a before pic of the cover.
i wanted to re-paint my motor cover so i hit the net and found some help because paying to have it done was going to run me about $300.
well,i stripped it down first and then used sandable primer and applied several coats of it and wet sanded between coats.after that i used several coats of matching evinrude blue paint.after that i applies 4 coats of clear coat with a wet sanding between each coat.since i couldn't purchase new nameplates i had to remove the old ones and strip them down.after that i hand painted the white lettering w/ white enamel paint and dark blue for the background. a local graphics business made some new decals for me and a new gasket finished the job off.i included a before pic of the cover.