Rebuild Repower

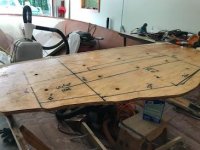
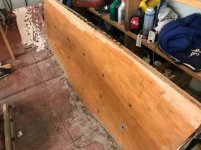
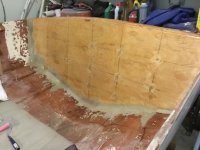
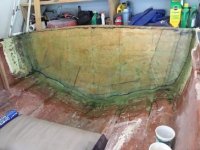
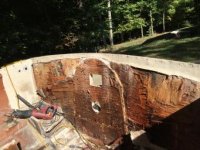
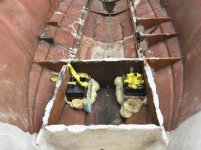
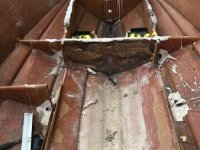
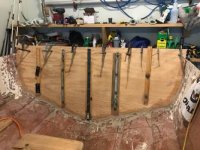
Plugging along, got the transom skin and knees out. the plywood is soaked but man it doesn’t want to come out!! Going to chip away at it for now.

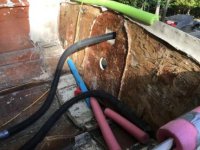
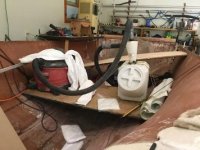
One question the 81CC I rebuilt had foam throughout, this one doesn’t. did wellcraft change that in some years.
 

Attachments

  • C62B4FCC-D074-443C-B61B-912FE0950CE4.jpg
    C62B4FCC-D074-443C-B61B-912FE0950CE4.jpg
    20.6 KB · Views: 31
  • E9FB8FA5-3ECF-4EF0-A5EF-7C52FC123230.jpg
    E9FB8FA5-3ECF-4EF0-A5EF-7C52FC123230.jpg
    19.7 KB · Views: 30
  • 95C792EF-D78C-45E6-9F0E-8508C13B18B5.jpg
    95C792EF-D78C-45E6-9F0E-8508C13B18B5.jpg
    22.4 KB · Views: 30
Got everything cut out. The stringers were soaked up to the bulkhead before the cuddy. I lucked out I’m not going to have to take the cap off. I sealed the dry stringers with Peanut butter and will build off them.

So next up the grinding!!! Yeah can’t wait :cen:. I’m going to wait until is cools a little more then get to it.
 

Attachments

  • 8ABBC0B3-28CF-446F-AF81-491298B65323.jpg
    8ABBC0B3-28CF-446F-AF81-491298B65323.jpg
    25.2 KB · Views: 39
  • 7962DA6A-A730-43A1-B62A-CD796358D232.jpg
    7962DA6A-A730-43A1-B62A-CD796358D232.jpg
    23.8 KB · Views: 36
  • 593EEFBB-0393-46ED-B9B9-A29FF64CDF19.jpg
    593EEFBB-0393-46ED-B9B9-A29FF64CDF19.jpg
    25.1 KB · Views: 39
Got everything cut out. The stringers were soaked up to the bulkhead before the cuddy. I lucked out I’m not going to have to take the cap off. I sealed the dry stringers with Peanut butter and will build off them.

So next up the grinding!!! Yeah can’t wait :cen:. I’m going to wait until is cools a little more then get to it.

Wow! :clap:
 
Wow it’s been a long time

So hey guys it’s been a few few months and ALOT has happened since I last posted. Well just not that much to the boat. I was informed as I was dismantling the boat that our basement was getting finished this winter... by me. We also were putting in a 60 by 20 garden. Only problem with that is we live on the side of a valley so we have NO level ground, 120 tons of fill/topsoil later, fencing, tilling, etc I finished that. The basement was next.... so 6 months later I can restart on the boat. Well during that time a mouse condo started in the boat :cen::sick:
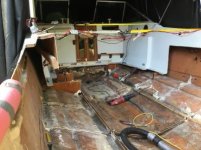
. They ate EVERYTHING!! All the new wiring, the entire cuddy was destroyed, and the largest nest I have ever seen was in the cuddy floor.

After seeing the destruction I had to come up with a new plan. I was perry down and didn’t document much until now. So the new plan.

1. Cap had to come off to get to the mouse condo in the cuddy floor
2. Since I was there the strings under the cuddy might as well come out and replaced.
3. Rip out all the wiring (all new as of two years ago)
4. The bracket I was getting got sold under my nose to another guy, so I am going in deep and doing my own.

So as of today I’m ready to start rebuilding.
 

Attachments

  • 0D2CA7D3-4A5C-4F13-A256-E0A304E3BCAC.jpg
    0D2CA7D3-4A5C-4F13-A256-E0A304E3BCAC.jpg
    20.2 KB · Views: 24
  • 08D4D1D3-219B-4AE2-A4C6-0726EE01586C.jpg
    08D4D1D3-219B-4AE2-A4C6-0726EE01586C.jpg
    20.4 KB · Views: 25
  • 884602A8-72F9-49EC-960D-45E7F373AA8A.jpg
    884602A8-72F9-49EC-960D-45E7F373AA8A.jpg
    20 KB · Views: 28
  • 8B5F62C0-75AF-45D4-A995-B15D18F32A31.jpg
    8B5F62C0-75AF-45D4-A995-B15D18F32A31.jpg
    20.1 KB · Views: 26
  • 82711EB5-6AEB-439D-BB21-CC44738247C9.jpg
    82711EB5-6AEB-439D-BB21-CC44738247C9.jpg
    26 KB · Views: 26
More pics
So to explain the photos a bit.

I had some older light poles I used as a make shift crane. Didn’t take any photos but lifted the cap off. Not that bad.

Put it in the garage and blocked it up really good. I have 5 keel contact points and 4 on each side of the keel. Started cutting and grinding, man I hate that. Got everything smoothed out and ready for new glass.

I decided to use wood as I can got it out here easily, all the composites plus shipping was so expensive I couldn’t do it. Made the new transom will do two layer for 3/4 marine ply tabbed in with 6in then 12in 1708 tape and then two full covering sheets.
 

Attachments

  • B24FBB7B-5D24-4763-969C-0E5E32BFAB22.jpg
    B24FBB7B-5D24-4763-969C-0E5E32BFAB22.jpg
    20.2 KB · Views: 22
  • 0E734D7E-DECB-4F03-8DFF-61DDBFB4CDBA.jpg
    0E734D7E-DECB-4F03-8DFF-61DDBFB4CDBA.jpg
    20.1 KB · Views: 19
  • 4C67F377-8EC3-4BA0-AA71-E46C015579BF.jpg
    4C67F377-8EC3-4BA0-AA71-E46C015579BF.jpg
    20.6 KB · Views: 22
  • F58EDAED-D37E-4C8E-9741-2E7D3F59C6A2.jpg
    F58EDAED-D37E-4C8E-9741-2E7D3F59C6A2.jpg
    20.5 KB · Views: 20
  • 2A54425F-1A22-4992-8CA0-05AA95FA9B27.jpg
    2A54425F-1A22-4992-8CA0-05AA95FA9B27.jpg
    19.4 KB · Views: 21
Testing fitting the transom wood I found I couldn’t get the curve correct. The wood was stronger then the glass. Everything I tried bent the existing transom glass to the wood and distorted the transom. after trying 4 or 5 different ways I ended up settling on drilling 13 holes through the boat and wood with a full sheet of the 3/4 in plywood backer plate on the outside of the transom. I then took some 1/2 threaded rod and made my own bolts that had continuous threads. I’ll have to do the two layer of wood separately so I can bend the wood to the transom and not distort the glass. What a pain in the a$$ but I will match the curve. Going to get the first layer on tomorrow morning. Will bed with thicker resin and glass dust. Feels sooo good to start putting things back IN and not ripping them apart!!!
 

Attachments

  • 7C9CEFC7-EC30-4F00-8797-29DA2918B7A3.jpg
    7C9CEFC7-EC30-4F00-8797-29DA2918B7A3.jpg
    21.9 KB · Views: 16
  • 529B4533-2CF3-4EB6-B16C-84C31E08BD06.jpg
    529B4533-2CF3-4EB6-B16C-84C31E08BD06.jpg
    20.6 KB · Views: 23
Looking good. I plan to pull the cap on my '87 Center Console in the next several weeks to replace the stringers. Watching your thread for inspiration! - Greg
 
Thanks Greg, the hardest part of pulling the cap for me was getting the balance point right. Took a block and tackle, and three come-alongs.

I do most of the work myself, do I was able to con my pops over tonight to get the first transom core board in. Didn’t take that long at all.

Coated both the hull and the plywood with regular catalyzed resin, let the tack up. Took about 15 mins then mixed up a lot of thickened resin spread it out with a 1/4 inch trowel and bolted it to on. We got a really good amount squeeze out the sides so I’m sure there are no air pockets. Used what squeezed out to fill the gap around the ply and the hull.

We are going to let it sit over night then repeat tomorrow. I’ll let it cure for 3-4 days after and start on the stringers.
 

Attachments

  • B7EBBEEE-E349-46C0-8331-75E7D91D37E1.jpg
    B7EBBEEE-E349-46C0-8331-75E7D91D37E1.jpg
    21 KB · Views: 22
  • 1E050A31-7454-4909-A361-71C5AA76C1D6.jpg
    1E050A31-7454-4909-A361-71C5AA76C1D6.jpg
    19.5 KB · Views: 24
Everything actually went to plan this morning:sun:
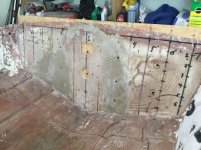
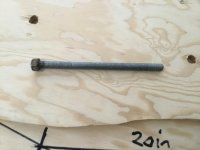
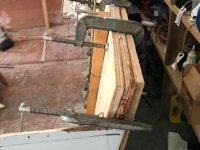
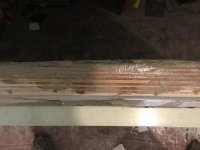
. The bolts where harder to get out then I thought so that was a pain but not a problem. Interesting the PB squished out to the bolt holes like I planed, the interesting thing was the mixture was so hard that it threaded the holes. I couldn’t break them out I had to unscrewed them. That made me feel real good about the bond and PB mixture I used.

The next layer was just a repeat from the first. I had two options
1. PB and same bolts
2. Layer of 1708 instead of the PB.

Others know way better them me about the pros and cons of both, but I decided that first one came out so well I was going to repeat the exact same process.

I think I will add a third layer of tabbing when I glass the transom in. So I’ll do 6in, 10in,12in, two full sheets of 1708. All hot coated to make sure I get a chemical bond on all the tabbing.

I’m going to give it a few days to cure then mix up more PB to fill the gaps and add a better radius to the wood hull joint. I’m going to try the PB in a plastic bag with the corner cut off, masonry style and see how that works.
 

Attachments

  • 52EE678D-29B1-4D00-9229-240CEE73E298.jpg
    52EE678D-29B1-4D00-9229-240CEE73E298.jpg
    20.3 KB · Views: 25
  • 9B1DAA9D-7423-4689-862A-813FDDBEE8C9.jpg
    9B1DAA9D-7423-4689-862A-813FDDBEE8C9.jpg
    20.6 KB · Views: 25
  • 317227A0-513D-4742-8134-8E738D04C569.jpg
    317227A0-513D-4742-8134-8E738D04C569.jpg
    20.5 KB · Views: 27
  • CE0EC116-5F34-47E5-B906-B7C5AE46A445.jpg
    CE0EC116-5F34-47E5-B906-B7C5AE46A445.jpg
    20.5 KB · Views: 24
Hey Twisted I was wondering - it looks like you've only got the hull supported on your caddies with the stringers out. Do you have any other reinforcing in place to prevent the hull from deforming?
 
Hey Twisted I was wondering - it looks like you've only got the hull supported on your caddies with the stringers out. Do you have any other reinforcing in place to prevent the hull from deforming?

Yeah I have the keel blocked in 5 different spots, and then 4 on each side (on the flat steps).

I leveled the stringers then blocked everything I could. Since I was walking, cutting, grinding, etc I didn’t want anything to move.
 
nice work:clap:

Interesting the different models of V20s. Yours had a full transom and it was flat all the way across. My 84 cuddy had a motor well and the transom angled from the sides. it was actually 3 pieces of plywood.

I was concerned when I first saw your post that you didn't consider that but I can see in the pix its OK. If I used a flat transom on mine the cap and motor well would not have fit when they went back on.


Thanks Skunk,

Oh mine is curved by a lot. It was original with a seadrive and has a small flat spot in the center. The only way I could match the curve was using the plywood on the outside and drew the inside plywood one at a time. When I bolted them in I used metal flat bars vertically.

The photo attached is looking down in the middle of the transom.
 

Attachments

  • 2481A4F7-36C9-45EA-9AD8-A430764F9AFB.jpg
    2481A4F7-36C9-45EA-9AD8-A430764F9AFB.jpg
    18.7 KB · Views: 21
Did a lot of small little things to get ready for this morning.
Fillets, corner radius, cutting the glass, etc all that.

It was perfect weather this morning 70 low humidity.

Tabbed in the transom core, three layers of 1708, 6in, 10in, 16in.
Sealed the core with a coat for resin, let it kick, then started the tabs. I let each layer kick before starting the next but all were wet on wet. Put one full sheet over the whole core and wrapped is around onto the transom skin. I took wax paper and clamped the top so it would “glue” to each side. Once that had kicked and a little extra I pulled the wax paper off. Not the results I wanted few air pockets and not great adherence.:head:
Instead of trying to just make it work I painted PVA over the whole transom/tabs, and let it dry. I’ll grind it down and add two more full layers when I do the stringers. The picture looks green because of the PVA.
 

Attachments

  • 824FF7D6-4927-4FD9-B22E-9A083030CEC9.jpg
    824FF7D6-4927-4FD9-B22E-9A083030CEC9.jpg
    19.3 KB · Views: 15
  • 42985C8E-FCED-4922-AC41-59E6FE67F608.jpg
    42985C8E-FCED-4922-AC41-59E6FE67F608.jpg
    20.3 KB · Views: 15
Back
Top