Rebuild Repower

You'll get it handled. Progress with some setbacks is still progress, just with extra educational content. Keep it up!

Assembled my lifting gantry tonight and will be pulling the cap off mine tomorrow morning. Wish me luck!
 
I’ve left the transom to fully cure, and have been working on the stringers.
Trying to get it right the first time I spent a few days measuring and re-measuring. I think I got everything where I want/need it so I cut the stringers.
They Came out good just need to fine tune them. The joint I decided I suck a scarf joints so I used what I call a saw tooth joint (not the right name). I decided to make the interlocking teeth 8in then glue them with peanut butter. The process wasn’t the bad just I was over measuring everything so I didn’t waste and plywood.

Hoping to have time this weekend to mock fit the stringers, bulkheads, and outside wedge pieces. Once I get things close I have to wait until the 16th to glass them in. I only have 1 or 2 gallons of resin left I know that’s enough for at least one side, but I really want to wait until I get another 5 gallons.

I’m planning on getting each stringer 100% glassed in one sitting to get a chemical bond throughout the whole stringer to boat connection.
 

Attachments

  • 1886A36C-364E-4C58-A42F-0B5D7B1B3FAD.jpg
    1886A36C-364E-4C58-A42F-0B5D7B1B3FAD.jpg
    18.6 KB · Views: 30
  • 8E1FCF38-DF5B-48EC-BD9A-1BF2B6595485.jpg
    8E1FCF38-DF5B-48EC-BD9A-1BF2B6595485.jpg
    20.8 KB · Views: 33
  • DDF51657-CB1A-4FBB-BA86-2E1415382701.jpg
    DDF51657-CB1A-4FBB-BA86-2E1415382701.jpg
    19.6 KB · Views: 29
  • 9D3CCD5A-257E-4DA1-A34B-AD1B75EBA52C.jpg
    9D3CCD5A-257E-4DA1-A34B-AD1B75EBA52C.jpg
    19.6 KB · Views: 25
  • 45E8CF34-2930-495E-87EC-72BE96469C59.jpg
    45E8CF34-2930-495E-87EC-72BE96469C59.jpg
    19.7 KB · Views: 28
I’ve left the transom to fully cure, and have been working on the stringers.
Trying to get it right the first time I spent a few days measuring and re-measuring. I think I got everything where I want/need it so I cut the stringers.
They Came out good just need to fine tune them. The joint I decided I suck a scarf joints so I used what I call a saw tooth joint (not the right name). I decided to make the interlocking teeth 8in then glue them with peanut butter. The process wasn’t the bad just I was over measuring everything so I didn’t waste and plywood.

Hoping to have time this weekend to mock fit the stringers, bulkheads, and outside wedge pieces. Once I get things close I have to wait until the 16th to glass them in. I only have 1 or 2 gallons of resin left I know that’s enough for at least one side, but I really want to wait until I get another 5 gallons.

I’m planning on getting each stringer 100% glassed in one sitting to get a chemical bond throughout the whole stringer to boat connection.

Nice work!
 
Twist - I was wondering, in shaping your stringers are you matching the bare fiberglass height of the original? Reason I ask is there was 1" of peanut butter bridging the gap between my stringer tops and the sole. I've read many folks on iBoats and THT use PL Premium to secure the sole but I don't think I'm going to make up 1" of gap with a polyurethane adhesive. My thought is to increase my stringers by about 3/4" so there isn't as much gap to cover.
 
with your joints in the stringers...

There's no reason not to also sister a length of plywood across the joint and glass them together.
 
Twist - I was wondering, in shaping your stringers are you matching the bare fiberglass height of the original? Reason I ask is there was 1" of peanut butter bridging the gap between my stringer tops and the sole. I've read many folks on iBoats and THT use PL Premium to secure the sole but I don't think I'm going to make up 1" of gap with a polyurethane adhesive. My thought is to increase my stringers by about 3/4" so there isn't as much gap to cover.

I’m doing a mix of what you talked about. I went through took all the measurements and then transferred that to the sides of the hull. Used a y foot level to confirm the heights. This created a floor height level. I then ran strings at the sights of the bulk heads and stringers to get the heights. Thankfully the heights were all very close 1/4 inch off. Used a common middle height, that put me close.

Skunk, I was thinking the same thing.
 
Wow it’s taken so long to get things moving. LOTs of little adjustments to get the stringers to sit just right and give me the height I wanted. Took a few days to grind the surrounding glass to get a good bond once I start glassing.

Work has got me putting in way to much time and passing off projects that they “can’t find the money for, but can find the materials”. :sick: I work with a high school athletic teams and I built a few chillers for drinking water years ago. Well they wanted another and one three times the size. That’s taken a lot of boat time away!!

Got the stringers “glued” with thickened resin and fiberglass dust today. Forgot to get pics of the alignment cribbing, but here is after they sat for 8 hours.
 

Attachments

  • B1A47D09-E8FC-4EF9-B6DB-0C5B59B5FD3B.jpg
    B1A47D09-E8FC-4EF9-B6DB-0C5B59B5FD3B.jpg
    19.6 KB · Views: 20
  • B355A64D-BBBA-414A-9C76-7BCFD229789D.jpg
    B355A64D-BBBA-414A-9C76-7BCFD229789D.jpg
    19.4 KB · Views: 18
Looking good. I hope to be at that stage after Labor Day Weekend. I will confess being a single guy with no real commitments outside of the daily grind helps with my rate of progress, though my wallet needs a little recovery time just like my body does LOL. I like your shelf/table over the gunnel. Might have to replicate that when I'm glassing in my stringers.
 
Well took me a week but I was able to slowly chip away at the fillets. I got them all rounded and sanded on the inside. I’m waiting for a 1/2 hand held belt sander to get the out side done. I was going to get the cheap harbor freight one but went with the amazon one for the free shipping. I get it tomorrow. Sunday I had the morning to myself so I spent 4 hours tabbing in the inside of the stringers. I wanted the best bond to the transom so I but a layer covering the middle 1/3 of the transom. Then tabbed in the stringers and knees with three layers of 1708 tape. 8inch, 10 inch, 16 inch. All wet on wet. had a few hiccups but over all other then my back be sore it came out nice. Only Took one pic, had to take a break and stretch out a little.

They are far from done I need to put a waterproofing layer from the tabbing up and then a cap. I’ll use 1708 from the tabbing to the top and then I have some 6oz cloth for the top waterproofing layer.
 

Attachments

  • 5A38B049-780B-406A-8D7E-6A262D1FDE32.jpg
    5A38B049-780B-406A-8D7E-6A262D1FDE32.jpg
    20.1 KB · Views: 21
  • 8A550326-CE9E-46C9-98E1-917EF4108681.jpg
    8A550326-CE9E-46C9-98E1-917EF4108681.jpg
    20 KB · Views: 19
Looking good. You'll like that sander, makes quick work of the fillets. I didn't have squat for process pics glassing mine either - time without gloves on was focused on guzzling water! Keep up the good work!
 
Took a few days off from working on the boat and work last week almost broke me. 30 hours on the clock in under 48 hours total, between football and a 34 team soccer tournament it took me a few days to recover.

This week I finished tabbing in the stringers. All the sides have 4 layer of 1708 all wet on wet. 8 in-10in-15in-then a 10 in covering any exposed wood. The knees got the same treatment along with adding a few layer to the transom.

I’m going to sand the sides tomorrow and waterproof the tops with two layers of 6oz cloth. Then on to the bulkheads and the side supports.

I never wanted to add foam back to a hull but I’m really thinking about it now. What do you guys think of this. So the outer sides of the stringers in cuddy cabins are not used for rigging. If I fill them with foam to the height of the stringers the shape out a low channel leading to the center line. Then once the foam is shaped to drain to the bilge, glass over them so the foam is 100% sealed and the water if any gets in flows over the glass capped foam.

Thoughts?

I’ll post some pictures tomorrow
 
Sounds like you've got a really stout lamination. Can't wait to see pics.

I too am mulling the foam or no foam question. I incorporated limber holes into each of the panels to the sides of the stringers to handle water - the original pieces didn't have a real method to address water that made it's way down there. The wings weren't formed down to the hull, they all stood a good half inch above, and the glass bridged the gap. What I noticed is that water that got down there flowed through some resin starved sections of that cloth, albeit slowly. Although few of the areas it could flow through were at the lowest point of the cell. If I foam I am going to leave the top of the foam uncapped and rely on the full channel I've created to provide a path for any water that does get there to exit through the limber holes and proceed to the bilge. Since I'm planning to trailer her all the time I'll keep her in a bow up attitude to promote drainage of anything that gets in. My bigger concern is cleaning up the passage that was made in the panel which covers the fuel tank compartment for the steering and throttle cables - they just cut a 4x6 hole in the edge of that panel. It is covered by the center console but I don't think relying on a bead of 4200 around the base of the console to prevent water on deck from making its way there instead of the cockpit drains is the best idea.
 
Foam is there to keep the boat in an upright position (no capsizing). It's not a guarantee that the boat will not sink, since the weight of the boat and items aboard (engine, etc) can effect that. Note that ALL foam will eventually become waterlogged if exposed to water, even the so called closed-cell type. However it will take years if not decades. When I redid my V21, after I removed all the old foam, I made sure all compartments that had new foam in them were sealed as best as possible to prevent any water intrusion.
 
Well just finished up sealing the stringers in yesterday. I ended up waiting a day to get some new mat. Sealed the top with a layer of 3/4 oz mat and then a layer of 6oz cloth. To make sure I got most if not all air. I fully wetted out the glass then used plastic wrap over the top to hold it down. Worked well.

I had the bow eye pad cut out and some extra resin so I put that in too. Once it was cured I over drilled the hole and then poured in more thickened resin so it will not rot this time.
 

Attachments

  • F1971952-5447-44C0-8050-3908008A40D8.jpg
    F1971952-5447-44C0-8050-3908008A40D8.jpg
    19.5 KB · Views: 20
  • 223C3F46-61A1-446A-AAF5-C9F23B8B7C0F.jpg
    223C3F46-61A1-446A-AAF5-C9F23B8B7C0F.jpg
    18 KB · Views: 20
  • F1224D8A-F1AA-475F-BB69-471817C5B4D9.jpg
    F1224D8A-F1AA-475F-BB69-471817C5B4D9.jpg
    20 KB · Views: 22
  • EAB8913E-0409-4464-AEBD-B930C0D642DB.jpg
    EAB8913E-0409-4464-AEBD-B930C0D642DB.jpg
    19.6 KB · Views: 21
  • F72F7B00-6B92-4EB9-9B21-954288547BE8.jpg
    F72F7B00-6B92-4EB9-9B21-954288547BE8.jpg
    19.4 KB · Views: 18
Well just finished up sealing the stringers in yesterday. I ended up waiting a day to get some new mat. Sealed the top with a layer of 3/4 oz mat and then a layer of 6oz cloth. To make sure I got most if not all air. I fully wetted out the glass then used plastic wrap over the top to hold it down. Worked well.

I had the bow eye pad cut out and some extra resin so I put that in too. Once it was cured I over drilled the hole and then poured in more thickened resin so it will not rot this time.

That's great!

I'm pleased to see you guys making the effort to restore your V-20s. It's got to be gratifying.
 
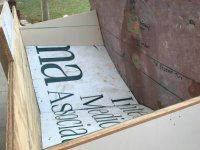
Ok so I’ve disappeared since September, it is has been very busy!
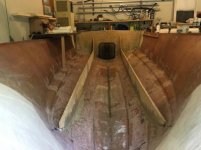
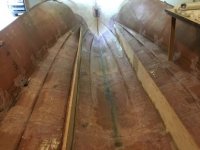
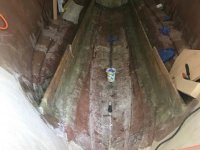
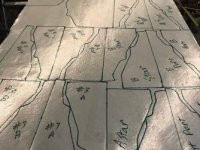
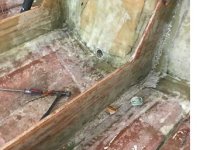
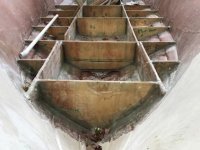
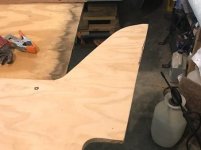
Finished off all the stringers, Bulkheads, and side support/ bulk heads.
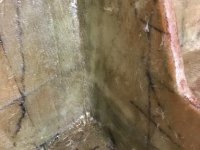
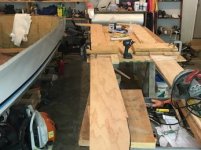
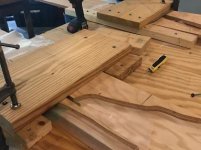
That really wasn’t that bad, I still had the temps for glassing just slowly picked my way though it. The next phase was where most of the time went. I almost bit off more then I could handle, I was going to buy a bracket mount it and be done, but it didn’t work out at all. I was looking for a used one and couldn’t find it, get 4 different quotes for news ones and the cost just made it impossible. So after reading and re-reading a few different builds I decided to build my own.
I had all the supplies other then the resin, so the whole bracket just cost 10 gallons of resin. What could go wrong hahaha!!

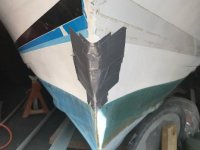
The mold ALMOST broke me. Trying to get the curve of the transom correct, the level of the tub correct, and have both sides identical took almost 2 weeks. I think I ended up redoing the whole frame work three times. I’ll try and describe what ended up working in the next few posts, right now I’m just going to do a photo dump and then edit the posts.


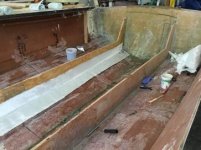
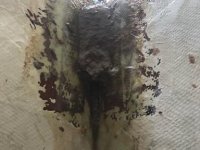
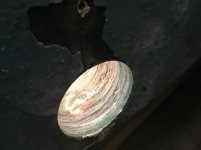
Once I finished up all the internal fiberglass, I drilled out the bilge drain to about 2 1/2 inches, the back filled with thickened resin.
 

Attachments

  • 9A1B67FD-8A85-433D-A6F6-181DD426186A.jpg
    9A1B67FD-8A85-433D-A6F6-181DD426186A.jpg
    19.9 KB · Views: 11
  • 9486402F-EE3A-4F0C-9DB7-000C6EE262DD.jpg
    9486402F-EE3A-4F0C-9DB7-000C6EE262DD.jpg
    20.5 KB · Views: 10
  • A09A31B2-7475-4681-80D1-F99249A6DED6.jpg
    A09A31B2-7475-4681-80D1-F99249A6DED6.jpg
    17.3 KB · Views: 10
  • 77D67A64-7BE1-4B39-BB7F-D91D63E49BFB.jpg
    77D67A64-7BE1-4B39-BB7F-D91D63E49BFB.jpg
    19.9 KB · Views: 12
Last edited:
The first picture is of the gas tank area. I couldn’t get it to fit right with a pvc pipe running under the tank so I made a false floor to enclose the tanks from the bilge. The area under the tank is more the enough room for water to flow.

The next is the lay out for the bracket, this wasn’t as bad as I thought. I was able to get all the information marked and was happy with the lay out. The curve on the transom has been a problem from the start, and continues to be a pain. I couldn’t use a straight edge like a level I had to use string and the mark every few inches for any mark going across. So the two semi vertical line on the outside are the edge of bracket tub the are angled about 15 degrees out from the center line. The two horizontal lines are the previous water line the lower one, and the higher up one is the top of the bracket 6 inches above the old water line. Then the bottom of the bracket is 3 inches above the bottom of the transom.

I had a 30 Aluminium sign we took Down from the soccer fields at work and thought it would be perfect for the mold. I ended up getting some melamine boards to use for the sides and back.

Will continue later
 

Attachments

  • FB96AC35-57C2-4D3A-96C1-9AEC2918EFC0.jpg
    FB96AC35-57C2-4D3A-96C1-9AEC2918EFC0.jpg
    19.9 KB · Views: 11
  • 156C2377-4833-491F-9708-52B0FA7689E5.jpg
    156C2377-4833-491F-9708-52B0FA7689E5.jpg
    20.2 KB · Views: 11
  • A4B47154-0048-47E5-A162-D044C732B4ED.jpg
    A4B47154-0048-47E5-A162-D044C732B4ED.jpg
    19.8 KB · Views: 9
  • 5C7AAA4D-52CE-4DF1-B48F-1CF23E77F4D6.jpg
    5C7AAA4D-52CE-4DF1-B48F-1CF23E77F4D6.jpg
    20.1 KB · Views: 8
Last edited:
Back
Top